'vue-cli-service'은(는) 내부 또는 외부 명령, 실행할 수 있는 프로그램, 또는 배치 파일이 아닙니다.
이런 메시지가 떠서 아무리 생각해도 이해가 되지 않았다. 하지만 전에 배울 때, package.json 에는 dependency 들이 모두 버전정보와 함께 들어있는데, 거기에 정의되어있는 dependency 의 버전이 현재 설치되어있는 vue 에 대한 버전들이 다 다르면 이렇게 인식을 못한다고 들었던 기억이 났다.
!! 그래서 git 으로 서로 형상관리를 할 때는 package.json 은 올리지 말라고 했던 기억이 난다.
npm 캐시를 지워주고 다시 npm을 설치해주면, package.json 에 의존하는 모듈을 설치해준다는 것을 찾았다.
npm cache clean --force #npm 캐시 삭제 npm install #package.json 의존하는 모듈 설치
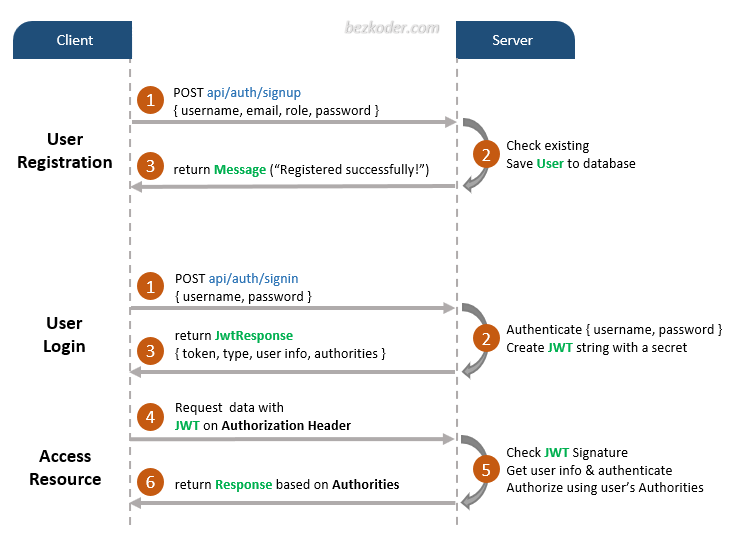
BackEnd : JWT 를 위한 Spring Security , Spring Mysql, Mybatis FrontEnd: Vuex, vee-validate
1. JWT (JSON Web Token) 란?
현재, JWT는 인증과 정보 교환에 매우 자주 사용된다. Session (Session-based Authentication)을 새로 생성하는 것 대신에, Server 가 데이터를 JSON Web Token 으로 encoding 해준 후에 Client 에게 보내준다 (3). 그러면 Client 는 JWT를 저장하고, Client 가 요청하는 모든 Request의 루트, 리소스를 보호하기 위해 JWT가 부착(4)되어있어야한다. (보통은 header에 붙어있다) 그 요청을 받은 Server는 그 JWT를 평가(5)한 후에 Response를 리턴(6)해줄 것이다.
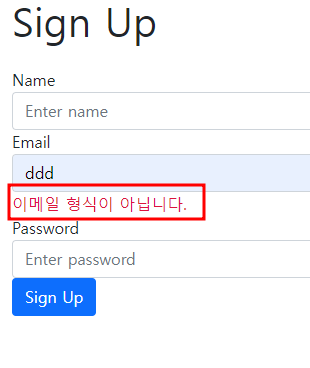
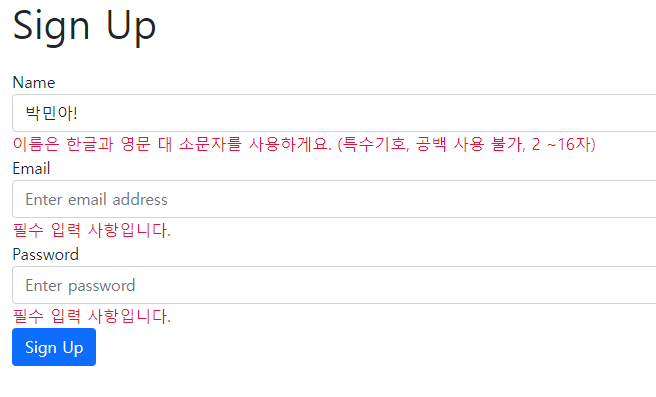
이렇게 input 박스에 v-validate="'required|email'" 을 넣어주고, name값에 email 유효성을 봐주고 만약, 그 email 유효성에 어긋난다면, 이메일 주소를 맞게 입력해달라는 메시지를 <span> 태그에 넣어줄 것이다.
나는 span 에 class값을 주어서 빨간색으로 보이게 설정해뒀다. 그런데, 영어로 되어있으니, 한글로 바꿔보자!
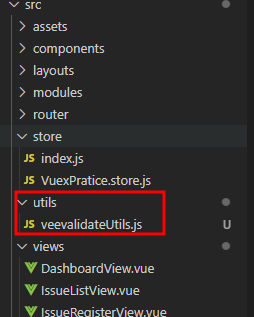
vee-validate에 설정되어잇는 error message를 customize할 수 있는데, 유효성에 대한 데이터만 따로 빼고 싶어서, utils라는 폴더를 생성해 veevalidateUtils.js 파일을 따로 빼두어 main.js 에 추가해줬다.
main.js
import Vue from "vue";
import App from "./App.vue";
import router from "./router";
import store from "./store";
import VeeValidate from "vee-validate";
import '@/utils/veevalidateUtils'

Vue.use(VeeValidate);
Vue.prototype.$axios = axios;
Vue.config.productionTip = false;

new Vue({
  router,
  store,
  render: (h) => h(App),
}).$mount("#app");
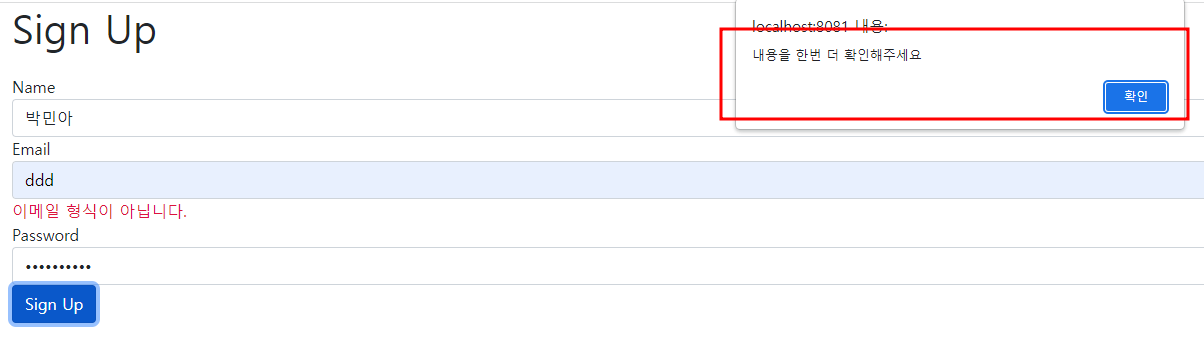
여기서, 아까 말한 이메일 형식에 어긋났을때의 메시지를 수정해 줄 것이다.
veevalidateUtils.js
import {Validator} from 'vee-validate';
import {email} from 'vee-validate/dist/rules.esm' // 기본적으로 제공되는 규칙을 모아둔 파일
// 존재하는 rule의 메세지를 바꾸기위해
Validator.extend('email', {
...email,
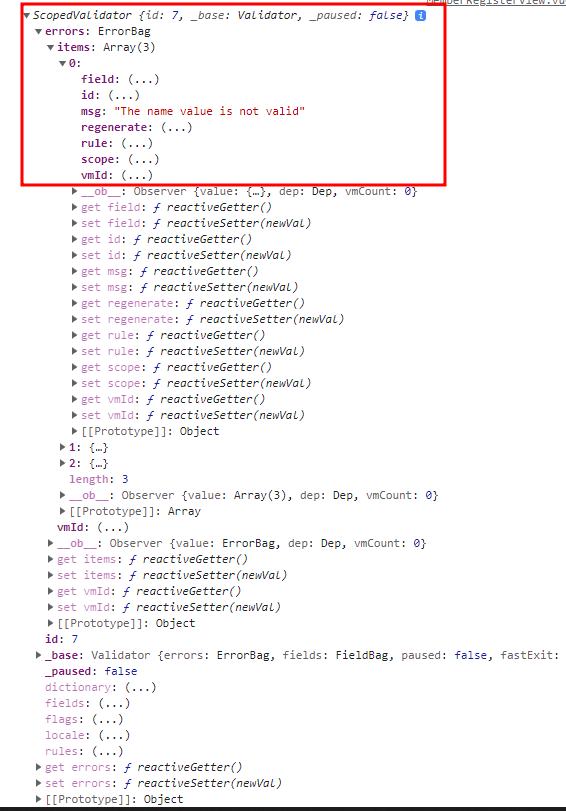
getMessage: '이메일 형식이 아닙니다.',
})
// 새로운 rule 추가
Action handlers receive a context object which exposes the same set of methods/properties on the store instance, so you can callcontext.committo commit a mutation, or access the state and getters viacontext.stateandcontext.getters.
이렇게 되어있다.
Action 은 context 객체를 받아야하는거다.
그 context 객체 안에는 commit, dispatch, getters 등이 들어있는거다!
그런데 이제 생각해보니, 회원가입 전에 있는 이메일주소인지를 확인을 하고 넣어야하는데...? 라는 생각이 들었다.
그래서 그과정을 넣어보도록하겠다.
java에서 미리 확인해서 보내는 과정을 넣었다.
// 회원가입
	@PostMapping(value = "/signUp/action")
	@ResponseBody
	public HashMap<String, Object> signUpAction(@RequestBody HashMap<String, Object> paramMap){
		HashMap<String, Object> returnMap = new HashMap<>();
		System.out.println(paramMap);
		if(paramMap != null) {
			// 일단 입력한 이메일주소가 이미 등록되었는지 확인하기
			int emailDupCheck = service.getCountMember(paramMap);
			if(emailDupCheck > 0) {
				returnMap.put("isSuccess", false);
				returnMap.put("errorMsg", "emailDup");
			}else {
				int result = service.addNewMemeber(paramMap);
				if(result == 1) {
					returnMap.put("isSuccess", true);
				}else {
					returnMap.put("isSuccess", false);
				}
			}
		}

		return returnMap;
	}
loginModule.js
import router from "@/router";
import axios from "axios";

const loginModule = {
    namespaced: true,
      actions: {
        async signUp(context, params){
          try{
            const res = await axios.post('/api/signUp/action',params);
            if(res.data.isSuccess == true){
              alert('회원가입이 완료되었습니다.');
            }else{
              if(res.data.errorMsg != null && res.data.errorMsg == 'emailDup'){
                alert('이미 등록된 이메일 주소입니다. 다시 입력해주세요.');
              }else{
                alert('화원가입을 진행중 오류가 발생했습니다. 관리자에게 문의해주세요.');
              }
            }
          }catch{
            alert('화원가입을 진행중 오류가 발생했습니다. 관리자에게 문의해주세요.');
          }
        },
      },

}
export default loginModule;
이렇게 했는데.... 말이 안되는 것 같다. 왜냐면, 일단 vue 를 쓰는건 결국엔 frontend와 backend를 완전히 구분지어서 작업하는게 가능하게 한것인데. 결국엔 backend 개발자가 front를 건드리는 느낌..... 아니면 axios는 결국에는 backend의 작업이니 이게 맞는건가.... 잘모르겟다.
좀더 깔끔하게 사용하기 위해서, loginModule.js 에서는 확실하게 Vuex에 관한 것만 넣어놓고 싶기때문에, alert처럼 에러나 action에 대한 각각의 처리는 vue에서 하는게 맞는것같다 ( 이미 만들어져 있는 프로젝트를 참고해보면 ) -> 물어보고 시도해보겟다. 왜냐면, backend 에서 error로 넘겨줘야하는데... 잘모르겟다.
아직도 완벽하게 Promise라는 객체가 이해가 되지는 않았다. 하지만 일단 내가 이해한 바로 설명해보면,
Promise 객체는 비동기 작업이 맞이할 미래의 완료 또는 실패와 그 결과 값을 나타냅니다.
대기 중인 프로미스는 값과 함께 이행할 수도, 어떤 이유(error)로 인해 거부될 수도 있습니다. 이행이나 거부될 때, 프로미스의 then 메서드에 의해 대기열(큐)에 추가된 처리기들이 호출됩니다. 이미 이행했거나 거부된 프로미스에 처리기를 연결해도 호출되므로, 비동기 연산과 처리기 연결 사이에 경합 조건은 없습니다.
Promise.prototype.then() 및 Promise.prototype.catch() 메서드의 반환 값은 새로운 프로미스이므로 서로 연결할 수 있습니다.
Promise.resolve() : 주어진 값으로 이행하는 Promise 객체를 반환합니다. 이때 지정한 값이 then 가능한(then 메서드를 가지는) 값인 경우, Promise.resolve()가 반환하는 프로미스는 then 메서드를 "따라가서" 자신의 최종 상태를 결정합니다. 그 외의 경우, 반환된 프로미스는 주어진 값으로 이행합니다.
※어떤 값이 프로미스인지 아닌지 알 수 없는 경우, 보통 일일히 두 경우를 나눠서 처리하는 대신 Promise.resolve()로 값을 감싸서 항상 프로미스가 되도록 만든 후 작업하는 것이 좋습니다.
async function 선언은 AsyncFunction 객체를 반환하는 하나의 비동기 함수를 정의합니다. 비동기 함수는 이벤트 루프를 통해 비동기적으로 작동하는 함수로, 암시적으로 Promise 를 사용하여 결과를 반환합니다. 그러나 비동기 함수를 사용하는 코드의 구문과 구조는, 표준 동기 함수를 사용하는것과 많이 비슷합니다.
async 함수의 실행을 일시 중지하고 전달 된 Promise의 해결을 기다린 다음 async 함수의 실행을 다시 시작하고 완료후 값을 반환합니다.
async/await함수의 목적은 사용하는 여러 promise의 동작을 동기스럽게 사용할 수 있게 하고, 어떠한 동작을 여러 promise의 그룹에서 간단하게 동작하게 하는 것이다. promise가 구조화된 callback과 유사한 것 처럼 async/await또한 제네레이터(generator)와 프로미스(promise)를 묶는것과 유사하다.
async function foo() {
return 1
}
위 코드는 아래와 같습니다.
function foo() {
return Promise.resolve(1)
}
async 함수의 본문은 0개 이상의 await 문으로 분할된 것으로 생각할 수 있습니다. 첫번째 await 문을 포함하는 최상위 코드는 동기적으로 실행됩니다. 따라서 await 문이 없는async 함수는 동기적으로 실행됩니다. async function의 반환값이 암묵적으로 Promise.resolve 로 감싸지기 때문이다. 하지만 await 문이 있다면 async 함수는 항상 비동기적으로 완료됩니다.
Promise는 비동기적인 처리를 위해 사용되는 콜백함수의 에러, 예외처리의 어려움을 해결해준다. 그래서 Promise 객체는 resolve와 reject를 받아 처리한다. Promise 다음에는 then() 과 catch()를 사용한다 . then() : 사용한 Promise 객체에서 인수로 전달한 resolve가 호출되면 실행된다. catch() : 생성한 Promise 객체에서 인수로 전달한 reject가 호출되면 실행된다.
※ async & await - 비동기식 코드를 동기식으로 표현하여 간단하게 나타내는것. - 코드가 장황환 Promise를 보완하기 위해 도입됨. - Promise 객체를 반환한다.
- function 앞에 async 를 붙이면 해당 함수는 항상 Promise를 반환 - await 키워드를 만나면 Promise가 처리(settled)될 때까지 기다리고, 결과는 그 이후 반환
//import router from "@/router";

import Vue from "vue";
import Vuex from "vuex";
import loginModule from "./loginModule";
import vuexPraticeModule from "./VuexPratice.store"

Vue.use(Vuex);

// store는 페이지 새로고침시 데이터가 초기화된다. -> localStorage를 이용

export default new Vuex.Store({
  modules:{
    loginModule,
    vuexPraticeModule,
  }
});
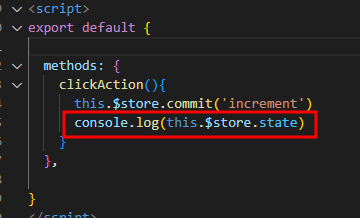
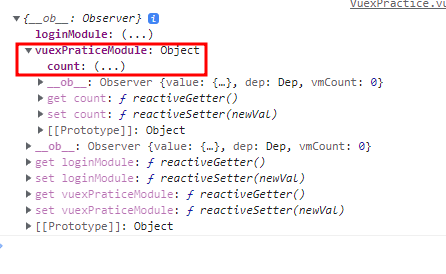
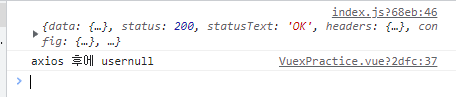
근데 console창에 undefined 가 뜬다
this.$store.state 로 찍었는데 저렇게 안에 잇는데도... 나오지않는다... 모르겟다.. 그러니 일단 넘어가보자!
내생각엔, module화를 함에 있어서 뭔가 내가 잘못한 부분이 있는 것 같다. 그래서 그냥 store.js 에 module화 시켰던 부분을 그냥 넣었더니 잘 작동하더라!
//import router from "@/router";

import Vue from "vue";
import Vuex from "vuex";
import loginModule from "./loginModule";


Vue.use(Vuex);

// store는 페이지 새로고침시 데이터가 초기화된다. -> localStorage를 이용

export default new Vuex.Store({
  modules:{
    loginModule,

  },
  // 모듈화로 뺏던 부분을 넣었다
  state:{
    count:0
  },
  mutations: {
    increment(state){

        state.count++

    }
}
});
그리고, 역시나 새로고침하면 count는 다시 시작된다
뒤에까지 모두 공부한 후에 왜 안됬는지 공부해야함!!!!
When using a module system, it requires importing the store in every component that uses store state, and also requires mocking when testing the component. 여기에 아마 키가 있지 않나 싶다. 하지만 잠시 넘어가자
전역으로 저장해서 사용해보기
main.js
import Vue from "vue";
import App from "./App.vue";
import router from "./router";
import store from "./store";
import axios from "axios";

new Vue({
  router,
  store,
  render: (h) => h(App),
  computed:{
    count(){
      return this.$store.state.count
    }
  }
}).$mount("#app");
그래서, 다시 생각해낸 방법 -> 전역으로 가지고 있는게 아닌것같으니 vuex를 전역으로 가지게해보자
main.js
import Vue from "vue";
import App from "./App.vue";
import router from "./router";

import Vuex from 'vuex'

Vue.use(Vuex);

const store = new Vuex.Store({
  state:{
    count:0
  }
})

new Vue({
  router,
  store,
  render: (h) => h(App),
   computed:{
     count(){

       return this.$store.state.count
     }
   }
}).$mount("#app");
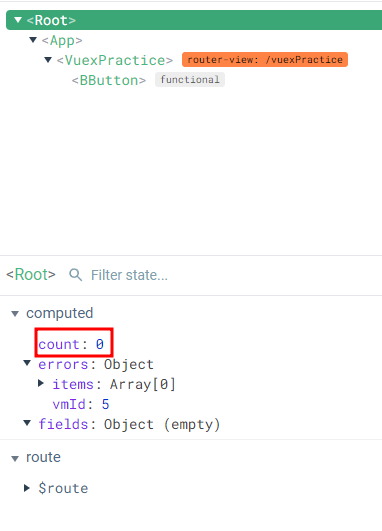
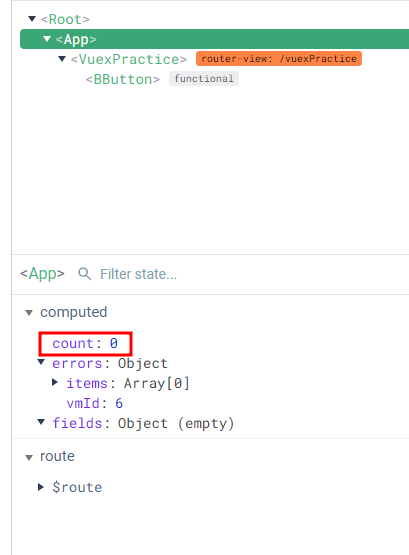
App과 Root에 모두 count가 찍혓는데.... 왜 도대체가 VuexPractice 컴포넌트에는 안찍히는거니.. 혹시 props로 주고받는거해야하니? 근데.. 공식문서에서는 됫자나!!!!!!!!!!
Vuex provides a mechanism to "inject" the store into all child components from the root component with thestoreoption (enabled byVue.use(Vuex)):
성공한거!!!! >>>> By providing thestoreoption to the root instance, the store will be injected into all child components of the root and will be available on them as this.$store.
여기서 힌트를 얻엇다!!!main.js
import Vue from "vue";
import App from "./App.vue";
import store from "./store";
import Vuex from 'vuex'

Vue.use(Vuex);

const Counter = {
  template: `<div>{{count}}</div>`,
  computed:{
    count(){
      return store.state.count
    }
  }
}
new Vue({
  router,
  store,
  components: {Counter},
  template: `<div class="app"><counter></counter></div>`,
  render: (h) => h(App),
}).$mount("#app");
store.js
import Vue from "vue";
import Vuex from "vuex";
Vue.use(Vuex);
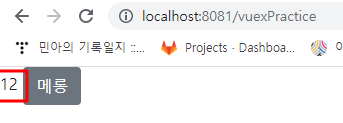
export default new Vuex.Store({
state:{
count: 12
},
});
아무리 Root에 있다고 하지만, 그래도 state에 접근해있는 변수를 가져오는 것이기때문에 $store에 접근해서 가져와야한다!
mapState helper
state에 너무 많은 변수들이 선언되어있을 때 쉽게 사용하기 위함이라고한다.
mapState helper which generates computed getter functions for us, saving us some keystrokes:
Getters Vuex allows us to define "getters" in the store. You can think of them as computed properties for stores. Like computed properties, a getter's result is cached based on its dependencies, and will only re-evaluate when some of its dependencies have changed. Getter는 컴포넌트의 computed와 비슷한 역할을 수행한다. 즉, Vuex Store로부터 상태 값을 읽어올 때 바로 읽어오는 것이 아니라 해당 상태 값을 활용해 계산된 속성으로 읽어오게 된다. 예를 들면, 특정 배열 상태 값이 있다고 할 때 해당 상태 값의 길이를 읽어오는 Getter를 생성해 사용할 수 있다.
mutations One important rule to remember is thatmutation handler functions must be synchronous. Why?
Now imagine we are debugging the app and looking at the devtool's mutation logs. For every mutation logged, the devtool will need to capture a "before" and "after" snapshot of the state. However, the asynchronous callback inside makes that impossible: the callback is not called yet when the mutation is committed, and there's no way for the devtool to know when the callback will actually be called - any state mutation performed in the callback is essentially un-trackable!
이런 식으로 했을 때, 당연히 /user/main 이 Dashboardview를 갈 줄 알았는데. 아니였다. 계속 그 컴포넌트를 가져가지 않길래, 믿져야 본전이지 라는 마음으로 맨 위와같이 /user/main 이라고 지정했더니 그제서야 DashboardView 컴포넌트를 타더라. 유의하자!